ShopDreamUp AI ArtDreamUp
Deviation Actions


Suggested Deviants


Suggested Collections


You Might Like…


Description
Original piece: [link]
Critique for =Eternal-Loveliness
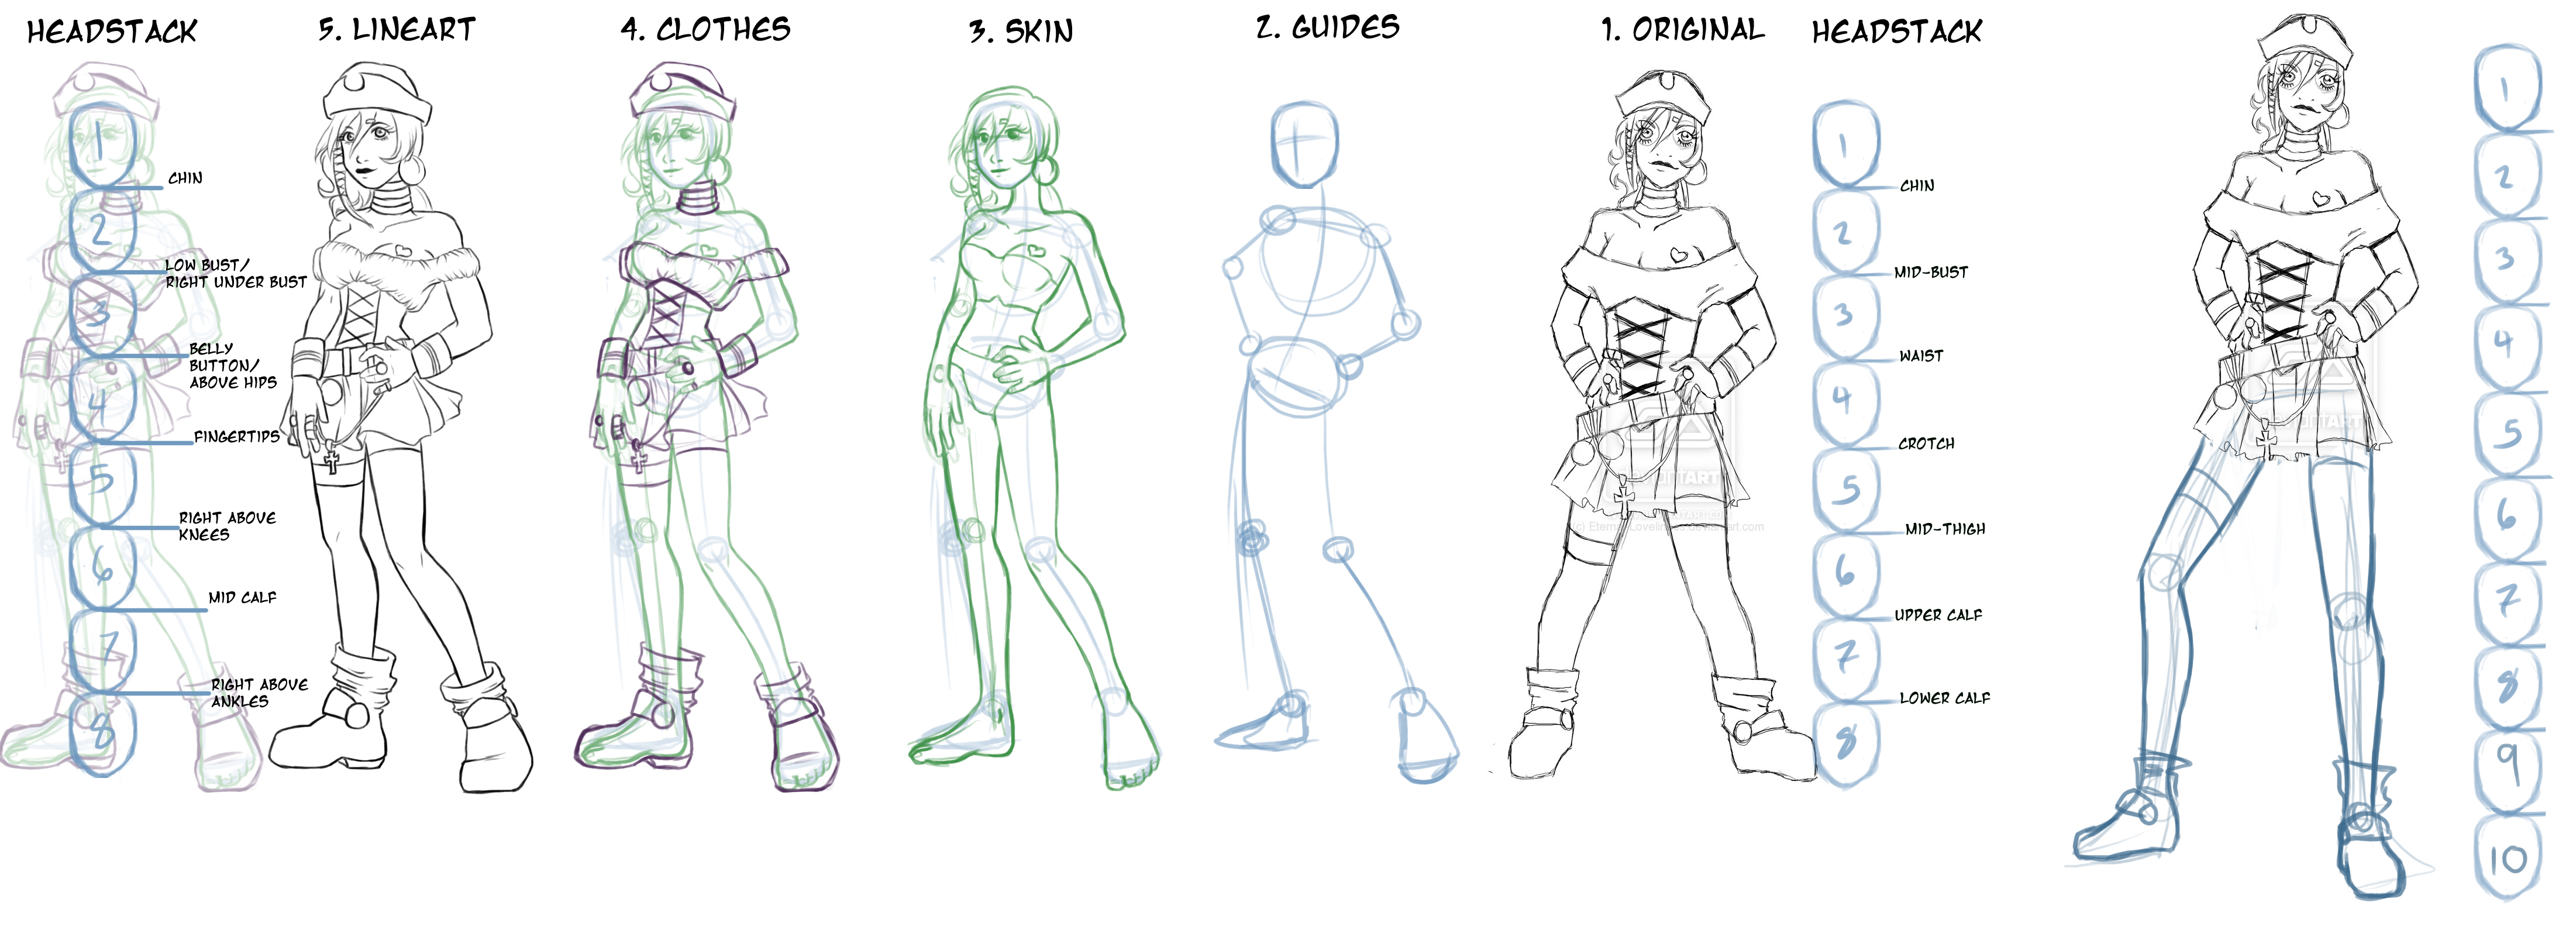
This critique goes from right to left.
Okay, I know I sound like a broken record when I say, "use guides" but rarely do I ever give someone that advice and they take it to heart, so I figure if I make an application to the principal, people will pay attention.
1. The original piece by the wonderful =Eternal-Loveliness She knows there's something wrong, but can't figure it out. Just by looking, I can see the legs look disporportioned to the body in that they look a bit on the short side and her boobs look a little droopy (even if she isn't wearing a bra, the corset does tend to lift the bust). Her legs also look like they're a bit at an akward angle. All these problems can be fixed by the application of guides. Now you'll have to bear with me as I try to do the character justice and not screw anything up (which I probably did as far as her design goes).
Okay, so the first thing I did was do a headstack to see the head measurements. I originally thought it was somewhere around 6 or 7 heads. Surprise! It's eight. If you want a quick fix, because the problem is a porportion problem in the legs, you could probably make her a 9 or 10 head height by lengthening the legs and you'd be good.
The torso still bothers me a bit though, so I'm going to construct another drawing 8 heads high to a better porportion. I usually draw about 6-7 heads high (I think... maybe not anymore) so I don't know exactly where the head measurements are supposed to settle. So I don't even bother with the measurements. Headstacks are only to be used to check your work afterwards. If you have a picture of a character and you're thinking, "This is awesome, everything is in porportion! I love this!" Then do a headstack, find out where everything lies in porportion to the head and either keep a mental or hard-copy note in case problems like this come up in the future.
2. Okay, so we're starting from scratch. The only thing I care about right now is the pose. No details. Details can be the death of a picture. Do the hard work now, enjoy the details later. Alright, so I used a face cross to determine which way the face is pointing, a large and small circle to determine where the chest and hips are going to be on this girl and a long line running through for the spinal cord. We want her to look a little sassy (or whatever) so we add a little "S" shape to the spine. Look at pictures of models posing on the runway or the like, the "S" curve is very attractive. Also, I didn't do it here, but to excentuate the "S" curve, the shoulders and hips should not be parallel, but opposite, so that they "point" in the same direction to connect like a triangle/acute angle if they were connected.
=Eternal-Loveliness has a really good handle on arm porportions, so I won't get into that, but drawing the guides first make it easier to put things into porportion, like the legs. In the original, the torso to legs ratio is more of a 1/2 to 1/2 while sketched out with guides, is more a 2/5 to 3/5. No, I don't do exact measurements. The longer you use guides, the better you'll get at eyeballing the right porportions.
3. Now to add skin (and a little clothing to maintain some modesty). With the face, I usually let myself indulge in some details since the face doesn't usually have many details in it anyway. Doing the skin is a really great way to make sure that your composition is working out. In this step I had to move her left leg and arm to different positions to make her more balanced. This is the part where you flesh out and worry about shape, not line. We took care of line last step, so just worry about shape.
4. Now we add the clothes. Sometimes, I find myself trying to show too much of the character's awesome outfit that I forget to pay attention to important things like line and shape. So draw your clothes in after making sure everything else looks right. And you don't even have to do a complete, nicely tapered line for the skin, as long as it's satisfactory to you and everything is porportioned to how it's supposed to be, you'll be fine.
5. Now just go over with black pen/color and you're done. Now, I know there are mistakes with this drawing, but that wasn't the point, the point was getting the general porportions right.
And now, I'm satisfied with how it looks and I can compare the first headstack to the second:
1 Chin - Chin
2 Low-Bust (between under the nipple to right under the bust) - Mid-Bust (above nipple)
3 Belly Button - Waist
4 Fingertips (when hung straight down) - Crotch
5 Right above the Knees - Mid Thigh
6 Mid-Calf - Upper Calf
7 Right above ankles - Lower Calf
Now remember, the measurements, if taken from the Chin to the crotch (on the original), would probably work really well for a 9 to 10 head height character (I would also move the bust up just a little bit) But other than that, it looks great. But if you're trying to get a character within a certain head height, pay attention to where things lie within those porportions.
Critique for
=Eternal-LovelinessThis critique goes from right to left.
Okay, I know I sound like a broken record when I say, "use guides" but rarely do I ever give someone that advice and they take it to heart, so I figure if I make an application to the principal, people will pay attention.
1. The original piece by the wonderful =Eternal-Loveliness She knows there's something wrong, but can't figure it out. Just by looking, I can see the legs look disporportioned to the body in that they look a bit on the short side and her boobs look a little droopy (even if she isn't wearing a bra, the corset does tend to lift the bust). Her legs also look like they're a bit at an akward angle. All these problems can be fixed by the application of guides. Now you'll have to bear with me as I try to do the character justice and not screw anything up (which I probably did as far as her design goes).
Okay, so the first thing I did was do a headstack to see the head measurements. I originally thought it was somewhere around 6 or 7 heads. Surprise! It's eight. If you want a quick fix, because the problem is a porportion problem in the legs, you could probably make her a 9 or 10 head height by lengthening the legs and you'd be good.
The torso still bothers me a bit though, so I'm going to construct another drawing 8 heads high to a better porportion. I usually draw about 6-7 heads high (I think... maybe not anymore) so I don't know exactly where the head measurements are supposed to settle. So I don't even bother with the measurements. Headstacks are only to be used to check your work afterwards. If you have a picture of a character and you're thinking, "This is awesome, everything is in porportion! I love this!" Then do a headstack, find out where everything lies in porportion to the head and either keep a mental or hard-copy note in case problems like this come up in the future.
2. Okay, so we're starting from scratch. The only thing I care about right now is the pose. No details. Details can be the death of a picture. Do the hard work now, enjoy the details later. Alright, so I used a face cross to determine which way the face is pointing, a large and small circle to determine where the chest and hips are going to be on this girl and a long line running through for the spinal cord. We want her to look a little sassy (or whatever) so we add a little "S" shape to the spine. Look at pictures of models posing on the runway or the like, the "S" curve is very attractive. Also, I didn't do it here, but to excentuate the "S" curve, the shoulders and hips should not be parallel, but opposite, so that they "point" in the same direction to connect like a triangle/acute angle if they were connected.
=Eternal-Loveliness has a really good handle on arm porportions, so I won't get into that, but drawing the guides first make it easier to put things into porportion, like the legs. In the original, the torso to legs ratio is more of a 1/2 to 1/2 while sketched out with guides, is more a 2/5 to 3/5. No, I don't do exact measurements. The longer you use guides, the better you'll get at eyeballing the right porportions.
3. Now to add skin (and a little clothing to maintain some modesty). With the face, I usually let myself indulge in some details since the face doesn't usually have many details in it anyway. Doing the skin is a really great way to make sure that your composition is working out. In this step I had to move her left leg and arm to different positions to make her more balanced. This is the part where you flesh out and worry about shape, not line. We took care of line last step, so just worry about shape.
4. Now we add the clothes. Sometimes, I find myself trying to show too much of the character's awesome outfit that I forget to pay attention to important things like line and shape. So draw your clothes in after making sure everything else looks right. And you don't even have to do a complete, nicely tapered line for the skin, as long as it's satisfactory to you and everything is porportioned to how it's supposed to be, you'll be fine.
5. Now just go over with black pen/color and you're done. Now, I know there are mistakes with this drawing, but that wasn't the point, the point was getting the general porportions right.
And now, I'm satisfied with how it looks and I can compare the first headstack to the second:
1 Chin - Chin
2 Low-Bust (between under the nipple to right under the bust) - Mid-Bust (above nipple)
3 Belly Button - Waist
4 Fingertips (when hung straight down) - Crotch
5 Right above the Knees - Mid Thigh
6 Mid-Calf - Upper Calf
7 Right above ankles - Lower Calf
Now remember, the measurements, if taken from the Chin to the crotch (on the original), would probably work really well for a 9 to 10 head height character (I would also move the bust up just a little bit) But other than that, it looks great. But if you're trying to get a character within a certain head height, pay attention to where things lie within those porportions.
Image size
4404x1595px 1.61 MB
© 2009 - 2024 ftepainting
Comments19
Join the community to add your comment. Already a deviant? Log In
how big is a head?